Friday, 30 September 2011

Day 21 : Continuation of rainbow shader

Today is the end of first month.
Ziyaad and i went for the mocap shoot early in the morning
I went to faciliate them with placing some markers on the suit of the actors

Photos:


And i continue to work on the rainbow shader afterwards

I connect the various output colour of the rainbow node to all of the available colours input on the surfacemodel to foster the white brightness, intensity and the noise frequency level. I decrease the opacity furthermore as well


Playing with VOPSOP

I tried to generate some displacement using the VOPSOP, however the displacement is not showing. My intention was to apply some multiple bricks or hexagon shape displacement, i then ascertain that the reason why it did not work is because my geometry has no division for the displacement to take effect. I grudge to append displacement because the UVs mapping will change, the rainbow maps the UVs utterly on one single face. If there were subdivisions, the mapping will look duplicated, scaled, unproportionated.
This is one example what will happen when i subdivide it


Thursday, 29 September 2011

Day 20 : Mocap testing again

Today i went to help with the mocap setup, as well as my other groupmates, we have to lug cameras and tripods to the mocap studio. We took some time to setup the tripod, untangling and arranging the wires and connect it to the ultranet server. I have to pose as the mocap actor once again, after we calibrate the cameras, i have to stand and move away in front of each cameras to verify the maximum distance the camera can shoot, it was quite cumbersome. Hopefully the shoot tomorrow turns well

As for the rainbow bridge, i did not have much stuff to show, the rainbow bridge in the movie does have some form of bricks displacement, thus today i tried to create some bricks pattern with the VOPSOP network and did many test renders, the render turn out shabby, the mapping looks distorted. I am going back to try out more

The pictures of The Art Of Thor (Rainbow bridge):


Wednesday, 28 September 2011

Day 19 : Fixing & Tweaking


Mr douglas is going to retrieve back his art of thor book this week, hence i took a couple of pictures to store as reference, maybe i will upload them tomorrow. I tried to match the width and size with pertain to the size of the figure.


I was told that the rainbow color is being generated by the default UVs values, which implies that the colour will shift along to the camera or the scale/translation of the object. I have not found a way to map the position ideally the way i wanted

Today i played around with the surface model node, turning on most of the reflectivity options, ramping up the value high. The view only looks decent in some angle, in certain angle, the colour mapping looks scaled or invalid

I start to dwell over my terrain after helping ruth out with her terrain, realizing that there are many loopholes to figure out. I also found out my terrain was not subdivided out in the previous renders, and when i subdivded it again, the shader mapping went bonkers and haywired. I have been relying on the lava width parameter which i created and the blendregions node to navigate and adjust to the most desirable mapping i wanted.

From the picture. Initially there were white bumps protruding out which i believed is ensued by the new normals pointing out, which is triggered after the subdivision. I have to conceal them by connecting one of my pattern to 3th region of the blendregions to merge around and cover up the white portion

Here is what i got after i tweak and tweak today, hmmm someone said that it looks like a mine

Tuesday, 27 September 2011

Day 18 : Displacement to the rainbow bridge

Today was the mocap shooting day, i came down to facilitate them like placing some of the markers on the actors. Jia bao came in and gave me a tutorial on cites procedural modelling, the duration was around four hours long, but the final result was an awesome modeling digital asset that was pretty cool. But now i am going to focus solely on my rainbow shader as told by Mr douglas to even out the attention on my other elements, so that my progress will not be lopsided, , he also gave me the video on the main idea of the volumetric lights in lord of the rings

As for today, i added some noise, waves and cavities to create more jittery displacement. I got more to tweak more though. I also did adjusted the specular intensity of the surface model node, to blast the intensity for the brightly-lited look.I got the idea from a reference file of an ice shader, to create a more randomized outlook

Render 1

Render 1


Monday, 26 September 2011

Day 17 : Experiment with lava shader

Yeah i had to replicate the lava shader network from the non-commerical to the commercialized version. The network was huge and looks to be in a utter mess, i spent much time on recreating them. The network were based on a older version, which segregate the surface and displacement nodes, but i could pretty much understand where to connect in the material shader builder
I could not render the result even though i follow the steps accordingly

Replicating the nodes

Mr Ron came in and assist me, he also advises me to swap to the shader view whenever i tweak the value and decrease the division of the terrain to minimize the rendering time

However the multiply node seems to give problem, the opacity node is not working as well, the render image seem whitetish and overexposed. Then Mr ron troubleshoot and realize the issue is ensued by the color node of the ramp parameter, the value output is greater than 1, a lot greater. Thus we need a fit range node to clamp the value between 0 - 1 for the next node to read the information

Comparsion : with fit range node

From here, the render seem too whitetish

Comparsion : without fit range node

I tried to mix blend the both of them (lava shader and the mount doom shader), with a multiply & parameter node to adjust the intensity. I deliberately make the lava traits distributed in random area, i believe this look better than the one i did earlier on

Sunday, 25 September 2011

Day 16 : The start of rainbow shader

Over the weekends i tried to study other people's work of a ice shader, and try to understand the rational behind the usage and try to see if i could use them to build a shader for the rainbow bridge.

Here's the basic rainbow shader i constructed, i used the default rainbow node available in the network. I add some bumpnoise on the surface and normalized it to have some jittery effect. Then i mix the both of them together. Lastly i add a parameter to control the opacity for it to look translucent at the surface output

Render 1

Render 2


Gonna explore more on the lava shader for my terrain tomorrow

Friday, 23 September 2011

Day 15 : More fluid test

Yeah it is the end of the 3rd week, i feel that it is really time to hasten my pace to get more serious for other stuff. I will try to do some research during the weekends, houdini has so taught me to adapt to a more practical approach, it requires you think hard and to research a lot. The technical side of it intimidates me, but once i ascertain the way the thing works, i will find it very manipulable to get further with your result


Today i have been trying out fluids, and animating the mountain offset. Those are some of the sample shots. i also have observe how the lake and mount should interact with each other


Testing

Fluid render 1

Fluid render 2

Thursday, 22 September 2011

Day 14 : Animating basic grid for fluid

Today i went to act as the mocap actor again, but thankfully this time round the software is acting more rationally now, and the shoot is ready and scheduled to take place on next week tuesday


Anyway it's reaching the end of the 3rd week, and soon we are leaving the R&D stage and diving into work production. Mr Douglas dropped by today to share with me some good stuff. He bought a book titled The art of Thor to show us, the book has amazing aesthetic works, that walks you through the fascinating illustrations and design of characters, weapons and environment. Most essentially, the book has some good reference for me and also some of my groupmates to scrutinize and refer to, such as the heaven rainbow bridge, the densely populated urban scape; the matte painting were especially beautiful.


Mr douglas also recommend me to watch the movie called dreams of the earth which carries a great reference of the heaven atmosphere look. I am going to move on to research on the rest of the elements, which is lake of the terrain, the heaven rainbow bridge, and the buildings.


Mr douglas offered me a lot of good advice. He told me to simulate the lake with simple animated displacement shader on grid, this could immensely reduce the rendering load. And also rainbow bridge can be acquire by trying out ways on researching reflective map, with a bit of displacement, ultimately to obtain the look of frozen ice. Also research on procedural modelling, to replicate variations of the building with ease.


From tomorrow onwards i will move on to research on the various stuff, putting a momentarily halt to my earth terrain work, so here is what i have so far, i just include and tweaked a marble node to add to the detail. The "black" part has more crisp details now.


I did a simple test to animate the water grid, joyces taught me to apply <$FF*0.05> expression on the noise - Y on the mountain node to simulate the simple water movement. But the default water shader applied did not work for some reason


Wednesday, 21 September 2011

Day 13 : Start of mocap test and blending regions of shader with different patterns

I went to pose as the mocap actor earlier this afternoon since edmund has to leave earlier. Alas, the newly upgraded mocap software vicon blade is not functioning as well as expected, the calibrating process takes forever. The user interface looks new to me, and different in an optimized way.


I stumbled upon a way to lay different shaders onto the surface depending on the direction of the normals of the surface that is pointing at, allowing a more random distribution. The blend regions node was capable of doing that, with functionality of adjusting the blend values and blend blurness as well
From what i intepreted, the vectortofloat takes information of the normals from the surface globals then, the output has fval1,fval2,fval3 which equates to axis X,Y,Z. By connecting the fval2 = Y to the bias of the blendregions, this allows the different shaders that connected to the input of the different regions to map the shader accordingly varying on the pointing position of surface normals of Y-axis

This is one of the render i got when i messes things up, it looks pretty cool though


This is what i got so far, shrugging off what i have got yesterday, trying to get that random grey rocky patch isolating out; i used a turblelence noise for that, from the black surface, i also altered the mold to green colour, but only the threshold at minimal levels. I sought advice from joyces, she suggest me to add more better looking details to illustrate the individual rock and stone better


Some idea 

Tuesday, 20 September 2011

Day 12 : Height map alteration


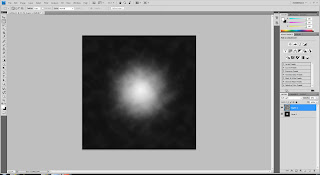
Yesterday i went back home and try out terragen for the heightmap, but was baffled with the new and awkward user interface. While thinking of other alternate ways, the thought of adding turbulent noise came to my mind. Thus i went to photoshop and tried creating clouds and on a soft light mode with a low opacity to lay underneath a white circle with the edges feathered, i scale it up as a finishing job

Screenshot

Then i tried to refine and smoothen the blunt edges of the look of the initial terrain, i tweaked the veins pattern and frequency over and over for a more randomized displacement, and lowered the clamp scale for the sharpness to diminish

Initial
Now

As for the shader part in the mold node, i tried to simulate some small random molten lava trait. I also studied rap's blog about his terrain work, this reminded me the essence of a shader breakdown, as taught in Ms Tan's programming shaders module. There ought to have layers of Base Color, Secondary Colors, Patterns, Displacement and bumps etc for shader writing.


Photobucket
Before & after texture transition
W.I.P
 http://s1130.photobucket.com/albums/m537/wjtan1991/?action=view&current=move2.gif&newest=1
Link to the enlarged pic

Monday, 19 September 2011

Day 11 : Motionbuilder talk

We went to attend the motionbuilder talk conducted by Mr anil in the afternoon, the attendees were all industry people. One of them did a presentation about his technical director role in electronic arts, doing processing and capturing motion capture data, and he gave introduce about the large-scale motion capture studio with 120 cameras over in canada, he explains the workflow and pipeline in comprehensive details. Some of them are even motionbuilder programmers

I realize i have reached a stagnate stage on my terrain progress, at the extent of i do not know how to improve on. The thing is i have thought over and decided to make a full revamp on it with the foundation that i have built these past two weeks, the issues are the heightmap does not fulfil a shape that is "organic" enough, the VOPCOP displacement noise has too much frequency and the shader look mundane with not enough layers

I wanted to amend a lot of things with my terrain today. Especially the heightmap, i did read that terragen is a great tool to generate realistic heightmap, however the school computer forbids me to install it as i do not have administer rights, i guess i will download and install the software at home and revamp the heightmap

Friday, 16 September 2011

Day 10 : Basic fluid test

Mr Ron is back, and he came in to check on us today
 He also reminded us to create a production schedule which is very important.

Mr Micheal also came in today to show me another method of doing my earth terrain, primarily to achieve an art direct-able lookHe started off by creating a box and subdivide it and add a mountain, he pull the vertices according to the mountain shape and further subdivide it. Eventually he did some noise displacement with VOPSOP network
Today i tried to experiment some stuff, i intended to sculpt the terrain to acquire an indent for the water to fall in, for the lake purpose. However i deem that my terrain has too many subdivisions, causing the whole scene to become heavy and react abnormally and laggy


This time round i tried on a new scene with basic geometry, i have use the sculpted fluid to do so. Basically just layer a grid over the terrain, and allow the scrulpt fluid preset to do rest of the job, i have tried playing with the attributes, and parameters. I also sought help from Jia Bao, he advises me to create a torus that represents the lake, and make it emit water particles with the normals pointing at one direction using Flip Fluid, and then add a bit of velocity to generate a slow transition of water flow. Ultimately add some noise to randomize the motion and make it seem more natural. Judging from the huge scale of my scene, he reckon that the scene will get real heavy

The renders did not turn out nice, but nvm it was just a tryout, generating realistic fluid is not easy, i should go back and recap on the tutorial on the basics of fluid

 I also did check out some information and references on volumetric lights, there are quite a lot of good stuff on the forums which revolves around VEX Lit Fog atmosphere shader  

Thursday, 15 September 2011

Day 9 : Introduction to fluid

Mr Douglas came in today and give us feedback on our work in progress. He commented that my terrain looks kind of proceedural and predictable, the displacement bump has a close distance to one another, therefore he advises me that the mountain ought to have a sense of art direction, which is like more organic, he also advises me to also improve the heightmap to add in more details like what bryan did during his fypj

I received the character for referencing to the actual scaling of proportion for the terrain in comparsion with the model

For today i smoothen out the mountain, and reduce the height of the bumpiness/displacement, i also tried painting a new heightmap but it was a flop as it was quite difficult to manipulate with the limited brush set and my brushing techniques

Close-up


Far


We also dicussed about the heaven terrain, the reference from Thor's rainbow bridge is a good idea, however the challenge is there in the shader writing shader. The look would be very new, clean and brightly lited kind of feeling.


After the terrain shape and shader is finalized, i would move on to research on the fluid. I have found a tutorial on the introduction to fluid, but have not really gone through it.
Mr Douglas told us that the rendering time would be a nightmare for us due to the tremendous elements involved, which includes the volumetric light that i have not really got into it yet, so we should keep our progress consistently, and stay on track with our work schedule.