Monday, 31 October 2011

Day 42 : Fluid test II

Today Mr Douglas came in, he feedback to me the things i ought to improve on, which is reduce the amount of water offset animation by half, render the sequence with z-depth in order to introduce lightfog in compositing for the depth map effect. Also the terrain should have a shoreline to enhance the realism.

He also shown us how to use $hip for saving files lest the files were missing and convenient to render on other terminal as well. He also place emphasis regarding the artistic scaling, as to compare with other object in the scene to gauge the exact scale.

The water reference found in LOTR

Current scene


Test render

Added more bumpy rocks in front (shoreline)

Saturday, 29 October 2011

Day 41 : Test rendering on a saturday

Came to school in the morning to realize that our card is inaccessible to the level 6 room. Thankfully there were some animation student around to help us to open the door.
Close up shot signifying the details of the rock pattern
Basically today was just test rendering. I don't know whether the current amount of details to the water would suffice since the lighting and atmosphere of the scene would look dim and obscure. Not so sure whether more details is neccessary in this case

I animated the offset of choppywater in one direction
Notice the glow/noise flickering on the lava, it was triggered with the abs() expression


Append a red tint to the water shader
This render is done in 640 x 480 resolution, estimated to take up two hours for 240 frames

Friday, 28 October 2011

Day 40 : Lava shader III

Mr Ron came in today and check on our progress, he said that we are somehow behind time. Thus he advises us to plan out the timeline to try to do as much as possible to show Mr douglas by monday. Hence most of us decided to come back to school tomorrow.

He also told us not to squander away too much time on perfecting the colour and shading, since we can do that in compositing instead at a later stage, so meanwhile just try to get the effects done.

For the base i tried to mix both stonewall together with varying attributes, colours and frequency and multiply with a lambert. Then i realize that the terrain set quite far away from the camera, the details does not look that prominent when rendered

Close up shot

With just basic water shader

With choppy water added

Mr micheal also came in today, he said that the lava looks nice, and he advises me to apply a glowing animation on the lava. Mr Ron therefore taught me to apply this expression at the parameter connected to the diffuse of lambert

the abs() was intended to prevent the value from running below zero
Then Mr Micheal thought that it might look too regular, so maybe i would leave it in compositing

Coming back tomorrow to continue working on the water (waves in VOPSOP, basic water shader, animated choppy water displacement)

Thursday, 27 October 2011

Day 39 : Lava shader II

Yesterday was public holiday so there is no update, was working on my portfolio blog instead

 
As for today i concentrate solely on the terrain shading since our objective is to complete shot 5 by friday D:


I tried to tweak and attain the look of a  few lava trait emerging at the peak. And i am working on the base shader, however i could not get the desired look. JB advises me to mix noise pattern or rock materials to get that complex look like the one in the reference picture Mr Douglas gave us.

Going back home to research and experimenting on how to get that black veiny charcoal rock pattern

Hope i could at least finish the full shading of the terrain tomorrow


Colourize the overall with a lambert of black assigned

Displacement with worley noise

Tuesday, 25 October 2011

Day 38 : Sea of glass IV & Masking of lava shader

The render was quite fast after zeroing out the value of reflect/refract limit


Some tryouts:
Tileable water displacement
Displacement layered with the water displacement map i found. It turns out to seem like discrepancies and noise rather than fluid
This is choppy water node displacement. Alas, i cannot combine it with the bricks pattern because the displacement_layer node only inputs image-based displacement 


Reference picture :
This is the reference picture Mr douglas provided, the deadly hopeless and gloomy atmosphere is what we are looking for. He wants just a few lava trait at the top

I create another turblence to fed into the bias of colormap to block out some portion of the lava. As the previous one was predictable and procedural

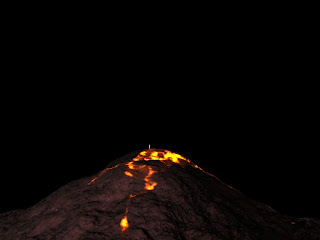
Okay i mask away the lava, leaving a few trait at the peak. Mr douglas is happy with the result, and i am going to work on the rocky base shader as soon as possible to substitute the dark portion illustrated in the picture

Monday, 24 October 2011

Day 37 : Sea of glass III

Continued to work on my sea of glass, i had to discard the previously done waves since it swells too uniformly. Thus i reconstructed a circle base with the a ripple and mountain node, the ripple node has a more ideal look of a waveform

I played with expression as well, i found some useful expression on expression cookbook site that drives many kinds of different waves and dynamics. Initially i tried abs(sin($F * 10), what it does is to drive the ripple node along with an up and down jerking motion. Later then i ascertained that a simple $F * 0.01 expression is what i needed
This is the unclean network, the rest of the nodes are used for testing earlier on
Scene View


Animation test

 
.P.S. I shall divert my attention to my terrain and lake tomorrow
I am also thinking of appending more displacing details & drive them with expression using the technique Mr Ron taught me 


Friday, 21 October 2011

Day 36 : IDM day helpout

In the morning before i went for the event, i went to class early and left the computer to render
I thinks that the wave movement seems to be a bit slow


Okay i re-render another one after converting it into a circle. However, notice when the wave reaches the peak, the peak seem too linear and uniform, the previous one has more displacement going on. Maybe i have to tinker with the mountain & peak node's attribute more


On top of that, Mr Ron came in today and set a goal for us to finish shot 5 by friday, and also he helped me by converting the grid to circle shape by using a csUniformScatter.otl from houdini exchange to scatter the points in an nice and uniform order. Since the 2dtriangulate node generates points in a randomized and wide-spaced fashion. On top of that, for my terrain lake, he told me that a good wave pattern should carries 3 sets of wave displacements. Firstly i would do a basic animation with the mountain node as the base, then i would animate the choppy water displacement node as the secondary, eventually i would animate a tileable water displacement image using UV project. Mr Ron taught me how to consolidate up to 16 displacement pattern together using v_dlayer SHOP node, you have to unhide it to use it, there is one for image consolidation as well named v_layer node, an interesting thing learnt


Lastly, me and ziyaad were volunteering at the
IDM day
Visitors settled down
The school i am in charge of
The school ziyaad is in charge of
Time for teabreak
Student queueing up for refreshments
Tour the secondary school students around, explaining to them the all aspects of digital media and also letting them to know about our school comprehensively. They also exhibit their interest and enthusiasm to us by asking many questions.
The animator career talk and video making of digital game & movies held earlier on is also very entertaining

Thursday, 20 October 2011

Day 35 : Continue to work on lava shader

Today Mr Douglas came in today, he is quite happy with our progress so far, he also told me to render a short sequence for the wave animation to have a better gauging of how well it flows. Shall do that tomorrow
.p.s. change the yellow part with purple

Anyway Mr Ron devoted a lot of his time to help me, to create the gradual fading effect of the shader. Intially the parameters is full of bugs, it goes haywired as we cannot control it from the outside, only from the inside. Mr Ron managed to fix that by recreating a new subnet to accommodate the displacement, displacement bound and shader together, instead of only having one material shader builder storing all of them together. Eventually he create attributeused to take the information of the parameter from the SHOP network, then used an expression $BBY; Y stands for the y-direction axis, which was intend for the fading to take place in the y direction coming down. And the $rampy, was to adjust the opacity from up down

Here is the lava shader network i have generated today, the main difference is i did not use the lava shader as provided, i tried to attain the colour with simple ramp, lambert and i apply the displacement with the noise pattern. I believe it looks better than the one previously done. Anyway i pick up a lot from stuff from lusheng's blog, he did some nice rock shading as well.

Render

Wednesday, 19 October 2011

Day 34 : Sea of glass II


Today i passed my wave displacement file to ziyaad for his crowd simulation test, however the heavy load of the scene is overwhelming due to the extensive scale and the high polygon faces i guess and therefore i did another simple underlying wave displacement and pass it to him


Test render flipbook of the wave movement
The actual render plays a bit smoother compared to this


Various renders of bricks displacement appended with different value:
- High displacement value

- Medium displacement value

- Low displacement value

Have yet to tweak the colors yet


Did some flipbook test render, i realize the displacement edges sharp looks like a blunt cone after converting the polygon from a grid to a circle, and the frequency i used to drive the movement does not seem realistic; it looked like jelly wobbling , might have to find other solution or try to fix this

Tuesday, 18 October 2011

Day 33 : Sea of glass I

I downloaded a displacement waves file from odforce. Basically it uses mountain node node to generate the curves of the base shape of the waves, then peak it to increase the height and then add another mountain node to displace the other little bit varying normals.

On top of that i also realize that there is a default choppy water node in the SHOP network, it will be useful for my development of the higher level of details in ocean or waves.

Today was a burn out day for me. In the morning and afternoon things gets frustratingly bad. The render gets excruciatingly slow after i add in the rainbow shader and bricks pattern. The shading looks awkward after changing displacement, and the houdini lags severely

Thankfully, the shading works later on after i UV project it, and i manage to get some renders even though it's slow after lowering the render setting tremendously.


Monday, 17 October 2011

Day 32 : The start of production

Today Mr Ron came in, asked him a couple of questions. He explains to me the idea of index of refraction/reflection for the frosted glass. Initially i was facing the issue with displacement bound and sluggish rendering time, Mr Ron endeavours to use some reflection and envmap node to substitute the frosted glass to minimize the rendering time and deliver the results, but it has got a lot more to append and tweak.

He also taught me how to paint the lava trait manually according to the way i wanted, some grouping node and expression $CR>0 is needed. However, this method seem difficult to create a good realistic shading, there seems to be shadow casting behind as well. Nonetheless i will take into account and explore more on this useful method.

Later on Mr Douglas came in to give advice to brace and get ready for real production and what to prioritize the work of the elements. For me, it would be the touch up on the ocean shader and then the waves for the sea of glass. Then the multiple terrains which i have to reconstruct cause the height is too high and the pattern is kind of predictable. Finalizing the terrain shader and Ultimately the lightfog.

Most essentially, Mr douglas wants me to acquire a third level of details for the ocean since the shot is a close-up and add in turbulence noise in VOPSOP and even displacement in shader.


Today,
reduced the expression frequency for the animation


Rainbow sea of glass, hmmm this is the closest reference picture i can find
Most likely tomorrow i would try to replace the brick texture displacement with the ice cube displacement. Then try to generate the waves pattern using pattern in VOPSOP

Friday, 14 October 2011

Day 31 : Displacement issue

Mr Ron came in today and check on our progress, i told him about the displacement bound haywiring issue i encountered and he ask me to try to use a texture node instead of a colormap. Alas, it does not work, maybe i would trial and error with some other method. Anyway we heard that Mr Douglas will be coming next week to block the shots. I would think hard over the weekends of what to do with the shader of the main terrain

As for today, i refine my displacement map by adding more definition into the small fraction of the little boxes. From the reference, i observed and notice that the bridge has fragmented trivial parts that forms one block together in the movie

Reference:


My displacement map in a material shader builder, first i connect the uv to the vectortofloat, then subsequently inverted the colourmap image with a luminance and append a multiple and a parameter node to manipulate the amplitude of the displacement level, lastly to a displacement along normal then to output
 Some renders today:
0.5 color opacity


0.6 color opacity

Thursday, 13 October 2011

Day 30 : End of week 6


It's drawing near towards the end of the week six, and my things aren't much complete yet, the models have to be finalized before the blocking of shots, getting a bit tensed up. Time to get more serious and hasten our pace

Anyway,
Earlier today,
I tried to do the shading for the multiple mountains

Reference picture

Marble & stone pattern with layers of white & black

Added mould patern, shaded main terrain
For the lava trait part, i still couldn't figure out a good solution to do

Displacement map i done in photoshop,
initially it was a coloured brick pattern, i have to grayscale it and clean off the discrepancies

Render one
Mr Ron was right, a displacement map fits the bill

Render two


However,
Problem faced with displacement bound

In close-up view, the displacement bound issue is very prominent
This colour saturation is what i am looking for

Displacement bound value at 0.7, any value greater than that takes forever to render, some artefact still remains and colour turns out to be vividly saturated
In spite of ramping up the value for displacement bound, the render is sluggishly slow. And the level of colour saturation increases along with the displacement bound value and i don't know what's wrong with that, hope Mr Ron comes in tomorrow